The Evolution of Core Gap Measurement Technology -From Feeler Gauges to Laser 3D Scanning for Precision Enhancement
The Evolution of Core Gap Measurement Technology
-From Feeler Gauges to Laser 3D Scanning for Precision Enhancement
The exceptional performance of transformers and reactors hinges on a microscopic dimension invisible to the naked eye—the precision of air gaps between silicon steel laminations. As the heart of electromagnetic energy conversion, the microscopic size and distribution uniformity of core gaps are critical physical parameters determining efficiency, noise, temperature rise, and even the lifespan of equipment. Amid the global energy transition, stringent energy efficiency regulations (e.g., EU Ecodesign, U.S. DOE, China GB-20052) continue to tighten requirements for transformer losses and noise. This drives core gap measurement technology from empirical judgment to advanced digital precision. This article systematically analyzes this evolution, revealing the technical logic and industrial value behind precision improvements.
Content
1. The Underlying Logic: Why Does Gap Measurement Precision Matter?
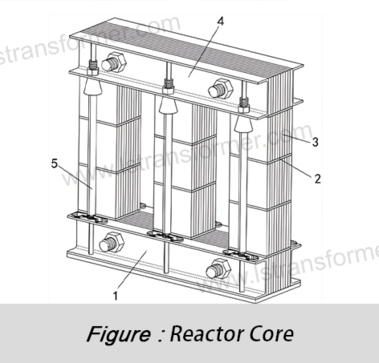
When alternating current flows through transformer windings, magnetic flux is generated within the core. Ideally, the flux should circulate entirely within the high-permeability silicon steel laminations. However, real-world cores consist of thousands of stacked laminations, inevitably creating microscopic gaps between them.
These gaps, though tiny, disrupt magnetic uniformity. As flux passes through gaps, magnetic reluctance spikes (air’s reluctance is far higher than silicon steel), forcing some flux to "detour," creating leakage flux. Leakage flux not only reduces energy transfer efficiency (increasing no-load losses) but also induces eddy currents in metal components, leading to localized overheating and abnormal vibration/noise.
Measurement errors in gaps directly cause uncontrollable magnetic performance fluctuations. For high-frequency transformers and large-capacity reactors pursuing performance, precise gap control has become a critical design and manufacturing barrier.
2. The Evolution: From Empirical Methods to Digital Empowerment
● Mechanical Contact Era: Limitations of Feeler Gauges and Micrometers
(1) Method Essence:Relies on operator skill and experience, inserting fixed-thickness feeler gauge blades between laminations or using fixtures with micrometers for point-contact measurements. This has been the global standard for decades.
(2) Precision Bottlenecks & Causes:
Surface Interference:Burrs, minor warping, or uneven insulation coatings on lamination edges prevent gauges from contacting the true reference surface, yielding inflated gap readings.
Contact Pressure Influence:Insertion force or micrometer pressure skews results—excessive pressure compresses laminations (under-reading), while insufficient pressure causes unstable over-readings.
Limited Sampling:Only measures edge or manually accessible points, failing to reflect true gap distribution across the core (especially internal regions). For large cores, sparse sampling introduces significant statistical bias.
(3) Consequences:Design margins must expand to cover measurement uncertainty, increasing material costs and device size. Performance (e.g., losses, noise) varies noticeably between batches.
● Optical Non-Contact Prelude: Laser Displacement Sensors
(1) Method Essence:Uses laser triangulation or confocal principles. A laser beam focuses on the surface, and reflected spot changes calculate distance.
(2) Precision Improvements:
--No Contact Errors:Eliminates mechanical deformation risks and insulation coating damage.
--High Sampling Rate:Thousands of measurements per second, far exceeding manual methods.
--Single-Point Precision:Under ideal conditions (clean, reflective surfaces), repeatability surpasses mechanical tools.
(3)New Limitations:
--Surface Dependence:Roughness, oxidation, or insulation coatings (color/gloss) affect laser reflectivity, causing weak signals or outliers on dark/rough surfaces.
--Point-Scan Bottleneck:While fast per point, full-area coverage requires slow scanning. Deep slots or obscured areas are challenging.
--Data Complexity:Requires motion systems (rails, robots) for multi-point data, increasing cost and complexity.
● 3D Digital Revolution: Laser Line Scanning & Structured Light 3D Scanning
(1) Method Essence:
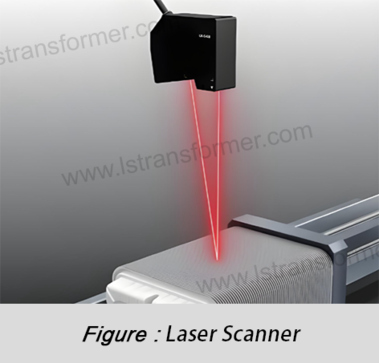
--Laser Line Scanning:Expands a single laser into a line (or stripe), capturing dense 3D point cloud data for an entire
surface profile in one. Movement yields complete 3D morphology (Keywords: 3D laser scanning core gap).
--Structured Light Scanning:Projects encoded patterns (e.g., Gray code, sinusoidal phase shifts) onto the surface. Multiple cameras capture deformed patterns, and phase-shift algorithms reconstruct 3D coordinates.
(2) Precision Leap & Advantages:
--Full-Area Coverage:Instantly captures millions of points, generating continuous digital models (point clouds/meshes), eliminating sampling bias (Keywords: high-resolution 3D measurement).
--Micro-Detail Capture:Advanced optics, high-res cameras, and algorithms (sub-pixel edge extraction, multi-frequency phase unwrapping) precisely map lamination edges.
Objective Data:Automated/semi-automated processes remove operator variability.
Advanced Analytics:Point clouds enable gap, flatness, waviness calculations, and distribution heatmaps to identify outliers.
(3) Core Value:
--Simulation Input:True 3D core surface data enhances FEA and NVH multiphysics simulations.
--Quality Control:Enables 100% inspection or high-ratio sampling,process capability (CPK), and traceable databases for optimization.
--New Material Support:Only viable method for fragile/non-crystalline alloy cores.
3. Macro-Impact of Micro-Gaps: Precision’s Ripple Effects
Laser 3D scanning’s ultra-precise gap data transcends measurement, becoming a core engine for design, manufacturing, and simulation:
● Loss Reduction & Efficiency Gains (High Search Volume):
Accurate gap data improves predictions of core losses (hysteresis, eddy currents) and stray losses (from gap non-uniformity). Optimized stacking/clamping cuts no-load losses, meeting strict standards (IEC 60076-20, DOE, EU EcoDesign).
● Vibration & Noise Suppression (High Search Volume):
Gap uniformity is key to reducing magnetostriction vibration and electromagnetic force imbalance. 3D data feeds precise NVH simulations, lowering noise for sensitive areas (IEC 60076-10).
● Design Margin Optimization & Cost Savings:
Replaces "fuzzy design" with precise calculations for magnetomotive force and coil turns, minimizing over-engineering and material waste (copper, silicon steel).
● Reliability & Lifespan:
Controls excessive/localized gaps, preventing flux density saturation and hotspots, enhancing long-term stability.
Era | Tools | Precision (μm) | Features | Advantages | Limitations | Applications |
Mechanical | Feeler gauge, micrometer | ±50–±200 | Single-point, contact, manual | Low cost, simple, intuitive | Low precision, human error, destructive | Field quick checks, legacy equipment |
Optical Point | Laser displacement sensor | ±10–±50 | Single-point, non-contact | No contact error, higherprecision | Surface-sensitive, slow area coverage | Critical point measurement |
3D Optical Scan | Laser line/structured light | ±2–±10 | Full-area, non-contact, digital | Ultra-precision, full coverage, advanced analysis | High cost, skilled operation needed | R&D, precision manufacturing, QC |
Table 1: Core Gap Measurement Technologies—Comparison & Evolution
In Summary
Modern laser 3D scanning shifts core gap measurement from "glimpses" to "total mastery." It empowers engineers to visualize gaps with unprecedented clarity, transforming once-vague parameters into precise, actionable data.
As precision breaches the micron barrier, transformer design sheds excessive safety margins, manufacturing escapes reliance on artisan, and every watt of loss reduction or decibel of noise elimination is grounded in measurable, analyzable, and optimizable data.
Contact Us
LuShan, est.1975, is a Chinese professional manufacturer specializing in power transformers and reactors for 50+ years. Leading products aresingle-phase transformer, three-phase isolation transformers,electrical transformer,distribution transformer, step down and step up transformer, low voltage transformer, high voltage transformer, control transformer, toroidal transformer, R-core transformer;DC inductors, AC reactors, filtering reactor, line and load reactor, chokes, filtering reactor, and intermediate,high-frequency products.
Our power transformers and reactors are widely used in 10 application areas: rapid transit, construction machinery, renewable energy, intelligent manufacturing, medical equipment, coal mine explosion prevention , excitation system, vacuum sintering(furnace), central air conditioning.
Know more about power transformer and reactor :www.lstransformer.com.
If you would like to obtain customized solutions for transformers or reactors, please contact us.
WhatsApp:+86 17267488565
Email:marketing@hnlsdz.com

 EN
EN
 FR
FR DE
DE ES
ES


